Learn about the process, technologies, tools, and techniques we used to hand-make a new illuminated sign for our Tokyo headquarters office.
As you may know, on March 1, 2019, we merged with QuickTranslate and changed our company name from anydooR to Xtra. We, therefore, needed to create a new sign for the reception of our Tokyo headquarters office.
We were curious about Philips Hue; a line of color changing LED lamps and white bulbs which can be controlled wirelessly. We found out that Apple stocked the HomeKit version, so went to their nearest store to our office; Apple Ginza.


At this stage, we were thinking to somehow use the lighting inside a 3D printed sign. We learned that the MONO co-working space in the Tokyo Telecom Center building had a workroom and 3D printer, so made our way over there.


When using the workroom for the first time, you have to get instruction from the person in charge. So, while we were waiting, we made a 3D model.

After a while, when the person in charge came, we told them of our plan to create a sign with their 3D printer.

However, we found that it could only deal with red, the work would take more than one day, and we'd need to make a reservation to do the work with the person in charge. We were in a hurry, so decided to research other options.

While we were doing that, the person in charge of the workroom suggested we instead try making it using a laser cutter.

That sounded like a great idea, so we went off to the nearest home center to buy wood.

There were so many different types of wood available that it was hard to decide, but we eventually settled on a kind that would be easy to deal with and went back to MONO.


We first had to process the logo data on dedicated software before it would work with the cutting tool.

At first, we tried to make a mini sign with a piece of wood.

It was the first time for us to use a laser cutter, so we were quite excited.
Wow - it turned out quite well! This trial confirmed the hardness of the wood, and so we were now ready to move onto creating the full-size sign.

We went through the same process and checked how it looked.

Hm? The cut didn't go through the wood fully because we didn't give it enough time. We set it again.

It wasn't bad, but we decided to give it one more go. It got a little scuffed but wasn't bad.

This is how it looked once we took out the middle pieces.
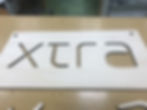
We did it!
With the laser cutter work complete, it was time to take the parts back to the office for assembling and finishing. Since it was wood, we decided to apply some glossy varnish.

The smell of the fumes went through our entire office, and we had to open some windows to clear the air.

Once the varnishing was done, we were able to start the assembly. Finally, we were able to incorporate our Philips Hue in between the cavity of the backboard and the front parts.

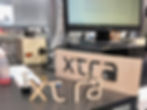
Looks good! We set it up in the corner of our office. Now to turn it on and let it shine!

And, we can even change colors!


It's important to have a workspace that you enjoy spending time in. Part of this is creating the environment itself. We look forward to showing off this sign to our office visitors!
The Xtra, Inc. blog brings you inspiration and tips on how to achieve more while reducing costs and growing profits. Be the first to get our latest content by subscribing to our newsletter (scroll down to sign up). Or, if you're listening to this article off-site, visit xtra.global (that's "xtra-dot-global") to join.
Written by Yuji, translated by DLKR